 As both the father of a nearly 3-year-old and a gadget nerd, I was quick to purchase a Yoto Mini when I first heard of it. The Yoto player works by you inserting cards into the top of the device, which prompts the speaker to begin playing audio related to that card. It’s got a cute design and is easy for my son to use himself — buying us precious moments of downtime. We have PAW Patrol stories, Laurie Berkner playlists, mini games, and many more. I love the use of physical cards as a way to switch between digital content; it’s very playful and tactile.
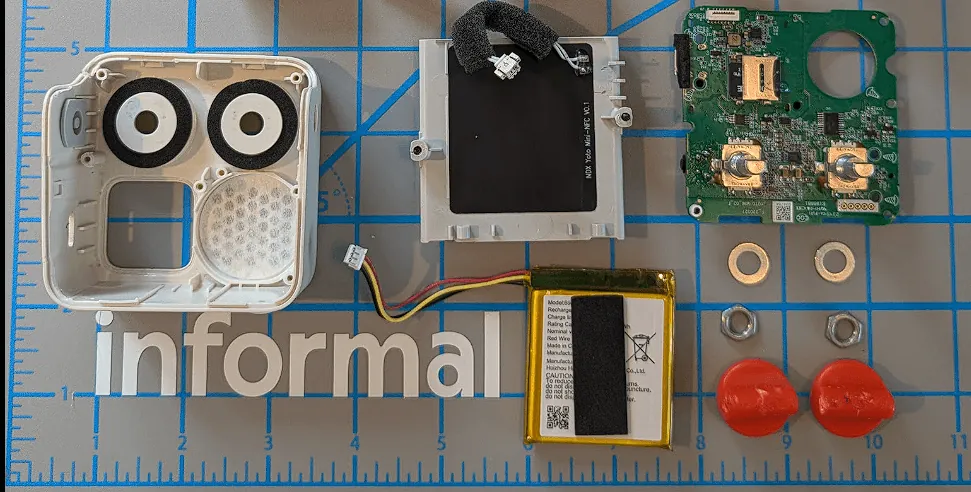
Naturally, I had to take it apart to fulfill my incurable huger for learning how things work. I didn’t want to risk breaking my device during a teardown, though, so Lindsey (our head of marketing) very generously accidentally backed over her device with a car and sent it to me.
As usual, tearing down the device was fascinating. For a product with an intentionally simple design, it had some interesting design choices under the hood. Here’s what it looks like in one piece as a product shot from the Yoto site:

The Yoto Mini is roughly 3 x 3 x 1.5” and has a nice matte texture to the plastic housings. The two-tone housings are neat, and I love the orange pop of color for the knobs.
The front of the device features two knobs you can press in like buttons, a speaker grille, and a small screen. The graphics on the screen are blocky and low resolution, and I initially though it could be made of discrete LED pixels, but further squinting at it convinced me it was just a regular LCD screen with cute artwork.
Rubber feet and pry tools
Two rubber feel are adhered into pockets in the bottom of the housing and provide some grip on a table. Having spied no visible screws during the review of the device, my first guess is that the rubber feet hide screws. This is common practice and I love doing this to provide a clean external surface but make assembly and disassembly fairly simple.
For some reason, though, the rubber feet are arc-shaped instead of straight lines. It feels wrong to me. Maybe I’m not cool enough to understand it, but I think Yoto may be doing too much here. A simple pill-shaped rubber foot would’ve made more sense to me. Again, I’m no designer, so I could be off here!
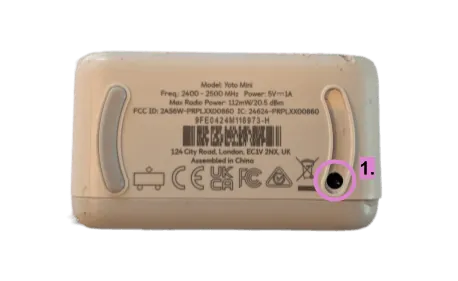
Removing the rubber feet and unscrewing the two Phillips head screws (1) allows the front and rear housings to open slightly, but there were some clips preventing me from getting any deeper. Using an iFixit pry tool, I was able to coax the clips open without any damage, allowing me to open up the housings.
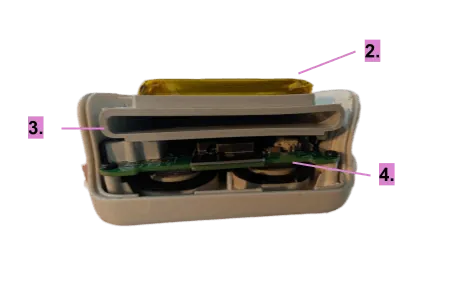
Inside, we’re greeted by a sandwich of a battery (2), a midframe (3), and the circuit board (4), all fastened to the front housing.
Nerding out on injection molding
Inside the rear housing, a mold ID code and material callout are also hidden inside, confirming that it’s indeed made of ABS plastic. Injection-molded plastic parts can get super complex, but if you know what to look for, you can quickly reverse-engineer how they were molded. On the rear housing, I was able to trace out the small parting lines that are the side effect of adding lifters to the mold.
Lifters are a magical solution to solving one of the largest issues with Injection molding part design, known as undercuts. Check out this video for a super simple explanation of why undercuts are an issue.
Most high-volume consumer electronics products leverage lifters to achieve fancy fastening features like snap hooks and screw bosses without compromising the appearance of the product.
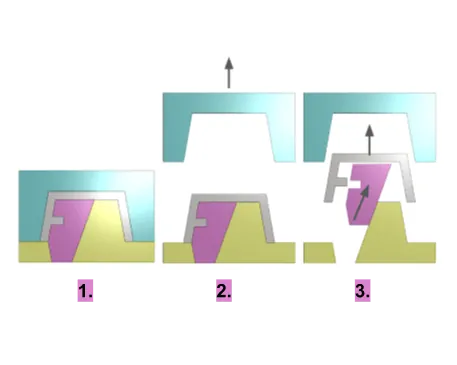
Lifters are separate components of the mold that can slide in different directions at different times of the molding process to allow for complex features like undercuts to be formed without causing issues. When the mold is closed (1), the lifter forms an undercut in the mold. The cavity can open without any issues (2) because there are no undercuts there. During the ejection of the part from the mold, the lifter slides out of the way, allowing the undercut to clear the mold (3).
Lifters: Learn them, leverage them, and love them.
Kid-safe design highlights
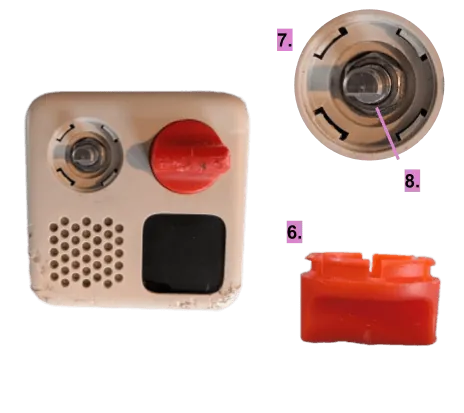
During the teardown, I tried to pull the knobs off but can’t do it without the help of a set of pliers. The knobs are actually made with little snap hooks (6), which prevent them from becoming yet another thing to worry about my toddler putting in his mouth. These snap hooks engage with corresponding snaps in the front housing (7), allowing the knobs to rotate and press inwards still. This is a nice little touch!
Also, I noticed two plastic covers were installed over the headphone jack and USB-C port, helping to reinforce them during any aggressive plugging or unplugging that kids are known to do. Smart.
Full video and teardown for more
And we haven’t even gotten to the PCBA board yet! Check out our video and the full teardown for all the nitty gritty details on the Yoto Mini. You never know what design choices you’ll see that you can apply (or avoid) in your next product build.
Informal is a freelance collective for the most talented independent professionals in hardware and hardtech. Whether you’re looking for a single contractor, a full-time employee, or an entire team of professionals to work on everything from product development to go-to-market, informal has the perfect collection of people for the job.